Digital
CDHD - Communication and learning Helper for Deaf and Hearing people
Application for Hololens to aid Deaf people in learning and in communicating with hearing people.
Project developed during the Usability Engineering Masters course together with Pimchanok Sripraphan and Vivien Nwoye (2017).
Participated of the Accessathon - Hackathon for disabilities in Rhein-Waal University.
Fabricademy 2017
week 7 - Textile as scaffold

Exploration of different techniques of applying textile in the industry such as composites, crystalization, concrete casting and agglomerates
Assigment
-
Create a prototype of a technical textile application using one of the techniques
Experimentation 1 - concrete casting
The group of students from FabLab Kamp-Lintfort experimented together first the concrete casting in stockings made of different textiles. The powder cement mix was mixed with water following the instructions on the packaging. The mixture was then casted in the textile, molded in different shapes and left for drying. The results however were not very successful. the dried concrete was very weak and easy to break.
Inspiration for personal project
For this assigment I wanted to create a semi-transparent bowl in which you could clearly see the fibers of the fabric composing it. My idea was to create a modern mold contrasting with the crafts appearance of the fabric. I searched for some design inspirations as the image shown in fig. 7.5 with geometric forms. To compose the composite I chose a very thin and translucent fabric with two different colors: pink and purple. Its borders also unravel easily so one can see the fibers clearly.
Experimentation 2 - textile composite
The second experiment we did as a group was to create textile composites using some different molds that were available in the FabLab. Each mold was made of a different material such as wood, foam and plastic. Also, some molds had a positive form and some had a negative form. To create the composite we did the following steps:
1. For the foam mold, we first covered it with aluminum foil using spray glue, since it is a permeable material. Plastic foil could also be used.
2. Then we sprayed separation spray in all mold in order to allow the separation of the composite from the mold after it is dried.
3. We tried in different molds two different binding material: Epoxi and white glue; both had very similar results in apperance and hardness. For the Epoxi we mixed 100g of catalyser and 30g of Epoxi. We used Epoxi in this experiment due to its characteristic of drying fast, however it is not recommended for it is not an eco-friendly material.
4. Next, we applied small pieces of textiles of different textures and color in the molds using a brush soaked with the binding material and taking care not to create air bubbles in the textiles. The bubbles must be removed in case it will not be dried in a vacuum machine.
5. At least 3 layers of textiles should be added. The quantity of layers depends on the thickness of the textile and the hardness that should be achieved.
6. The molds with the layered composites should be placed in the vacuum machine with a plastic foil on top, except the negative molds, which should be dried naturally. After starting the vacuum machine it is recommended to press gently the corners and details to assure that all air is taken and the details will be shaped.
Designing the mold
I first tried to design my mold using Fusion 360. I wanted to create the bowl with geometric shapes combining 2 different polygons on top and bottom. My first attempt was combining two twisted squares of different sizes but I could not create the triangular shapes that would link the squares and form the sides due to my lack of proficiency with the software. Since I have more knowledge of the Rhino software for 3D modelling I decided to design it in Rhino and import the form in Fusion to prepare the file to milling. The mold could also be printed in the 3D printer but I decided to mill it in foam using the CNC machine since it is faster than the 3D printer and also for the reason that I already used the 3D printer in previous assigmens and It would be great to learn a new process. In Rhino I managed to create the model shown in fig 7.8 combining an octogon on top with a square on the bottom and closing the sides with triangles.
When preparing the block of foam no mill I learned that the machine could mill maximum around 35 mm in height and my mold was 70 mm high. I had to change the form and it turned to be a more similar to a plate than a bowl.
After I imported the file from Rhino to Fusion360 I had some difficulties in setting the starting point axis. For some reason it took many attempts to place the axis of the starting point in the correct point and direction. The Fusion360 software identified each polygon as plane and not the whole object as solid. However, when playing the milling simulation it milled the mold as a solid with no problems. I input the settings according to the bit of the machine we were using and exported the file. After assuring that the milling was on the right track I left the machine to mill overnight.
Building the composite
With the mold ready, I proceeded as explained in the experiment. First glued aluminum folie to it and sprayed the separating solution. The, with the same epoxi mixed with catalyser I added 3 layers of the chosen textile cut in small pieces. After that, I placed the mold covered with plastic in the vacuum machine. I was advised that the strengh of the vacuum could deform slightly the foam mold. To avoid that I turned on the vacuum for 30 min. However, after this period the epoxi was still wet and if I removed them from the vacuum the composite would lose the shape. I decided then to vacuum the air again but leave the model in the machine turned off over night.
In the next day, the composite was dry but the plastic covering it merged with the composite and it was very difficult to remove. The reason for it must be that the plastic used was not the kitchen plastic foil recommended. Also, for some reason, some parts of the textile were not completely embeded in the composite. I cut the loose parts and trimmed the borders to improve the appearance. The results were not quite as expected but the effect of the solidified textile into a shape are in accordance to the initial idea.

fig 7.11 - Final result.


fig 7.1 - Preparation of the concrete casting.
fig 7.2 - Concrete molded results.


fig 7.3 - Epoxi and catalyser used.
fig 7.4 - Negative and positive molds with textiles.
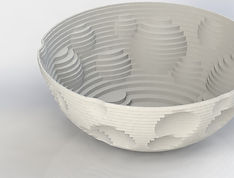
fig 7.5 - Inspirational image.

fig 7.6 - Fabric chosen.
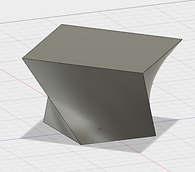

fig 7.7 - First atempt in Fusion360.
fig 7.8 - Mold design in Rhino.

fig 7.8 - Mold adjustment to adapt to CNC machine.

fig 7.9 - Mold in the vacuum machine.

fig 7.10 - Result after removing from the mold.
