Digital
CDHD - Communication and learning Helper for Deaf and Hearing people
Application for Hololens to aid Deaf people in learning and in communicating with hearing people.
Project developed during the Usability Engineering Masters course together with Pimchanok Sripraphan and Vivien Nwoye (2017).
Participated of the Accessathon - Hackathon for disabilities in Rhein-Waal University.
Fabricademy 2017
week 3 - Circular Open Source Fashion

Creation of modules and structures that can be connected to form an open source textile or fashion piece.
Assigment
Design and fabricate a modular reconfigurable system or seamless garments. The soft connection can be designed to be implemented in the assembly of a garment, being applied on the seams or it can be designed as single elements that act as construction parts of a garment.
Interlocking modules
I first started the assigment by understanding the interlocking system. With some printed grids in hand, I played with paper by drawing geometic shapes in transparent paper, using the grids as base. By trial and error, I cut the modules into positive and negative to interlock each other, experimenting with the overlapping of the shapes and testing always the strengh of the interlock.
Creation of a pattern
After understanding which results I could obtain by interlocking, I begun to research and study different patterns that could be interesting.
I drew some pattern and tried to reproduce them with interlocking modules, which unfortunately didn't resulted as I wanted. (fig. 3.1)
While I was searching for visual inspirations I found the image of a geometric pattern which, through my earlier experimentations, could lead to a good result as a module.
First I drew some drafts in paper and, using again the paper grid, I replicated it in paper to try the interlocking of the modules.
Refinement of the module
When testing with paper I realized it was not possible to create the results I wanted with only one module, which had positive and negative interlocks in it. Although is was not ideal in my point of view, I had to create two different modules: one positive and one negative.
After designing the modules I tested them with colors to understand which shapes could be formed.
Production with the laser cutter
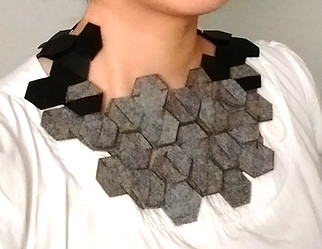
I designed the modules in Illustrator and chose the textiles I wanted to use: a grey felt and black synthetic leather. I made several cutting and engraving tests of the materials in the laser cutter machine of the FabLab to check which settings would be ideal for each. For that, I made a testing file with squares and applied different values of power and speed to each using the color mapping feature. Each color correspond to the color of the layer in which the object is. The best result was S100 and P55. To set the machine, I had to fix the focus of the laser and define the initial point. After adjusting all settings I used the illustrator file adjusting the stroke of the line to 0,001 and cut several modules in each material.
My initial idea was to create an accessory that would protect the neck and chest but after cutting and assembling the modules I liked the result as a necklace.

fig 3.6 - Illustrator cutting file with male and female modules.

fig 3.1 - attempt to create a pattern inspired in fish scales.


fig 3.2 - image used as reference for the final results.
fig 3.3 - design of the module on paper, following a grid.

fig 3.4 - color study with the modules.

fig 3.5 - cutting and engraving tests.